How To Make A Tattoo Gun? [10 Actionable Steps]
Every tattoo is a creative and personal form of expressing yourself. Creating tattoos with a gun that you made gives it even more significance. So, are you interested in learning how to make a tattoo gun at home? It is not that hard!
You could practice and polish your skill with it. However, using a homemade tattoo gun to work on real skin would be dangerous, especially if you do not have any formal training. Instead, it is best if you use it for practicing on artificial skin or fruits.
As I mentioned, the process is not complex at all. I divided it into two parts, each of which has some steps to follow. The first part pertains to getting the components ready, and the second part is about assembling the tattoo gun. So, without further ado, let’s go for it!
How To Make A Tattoo Gun: Creating The Components
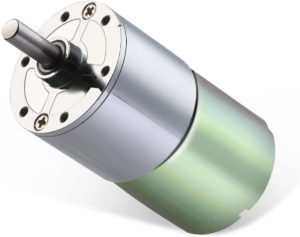
Step 1: Finding A Motor
You will have to find an electric motor. Something like a rotary motor will do too. Just get something that functions at 12 volts at least. The ideal voltage range would be 18v.
The motor has a tiny shaft to protrude from its center. Take a small-sized four-hole button. Then affix one to the other with some superglue. Do not use a lot of glue. That might seep through the buttonholes and block them. They have to stay open for you to secure the needle.
After you finish with the attaching part, let it dry.
Alternatives: If you do not have a button, find an eraser. Any mechanical pen has one. Take it from there and push it hard onto your motor’s small shaft.
You can use the motor of a remote control car or a VCR. But those are not that powerful at all. It is only nearly 3.5 volts.
Step 2: Creating The Tube
You can make a tube with a pen or pencil. It will guide your needle.
Take a mechanical pencil. Pencils made of plastic or metal will work too. Depending on how you prefer it, you can size it down to 3 or 4 inches or leave it as it is.
Alternatives: You can also use a regular stick pen. In that case, you will need to get its ink cylinder out. If you want, you can cut it down to 3 or 4 inches. After filing the pen’s brass tip down and getting its ball out, make its hole large enough so that it can allow the needle passage.
Step 3: Designing A Brace
You need to design a brace to provide the tube with sufficient support when it stays fastened to the motor for your tattoo gun.
To do that, use a teaspoon to break the bowl. Break it from your eating part. After that, bend your spoon to give it the shape of an L.

Alternatives: Instead of doing what I told you above, you could also cut off a toothbrush’s bristles and shorten it to 4 inches in length. Then find a lighter and use it to heat the plastic handle of your toothbrush and give it an L shape by binding it. Hold it until the plastic becomes cool for it to become stiff.
Step 4: Making A Needle
Now is when you need to find an old and unused metal guitar to get a string. Cut an inch of it or so to keep it longer than your tube’s length. It should be able to cover the motor’s center to the tube’s tip after assembly.
Then grab a pot and put some water and soap into it. When it starts simmering, drop a needle into the water. Let it boil for four to five minutes. Afterward, have it properly cleaned using clear water. And then do the drill again. This time, it will be water only, no soap needed.
If you want to prepare more than one needle at a time, you can do that. Remember to use a sterilized pot to store them.
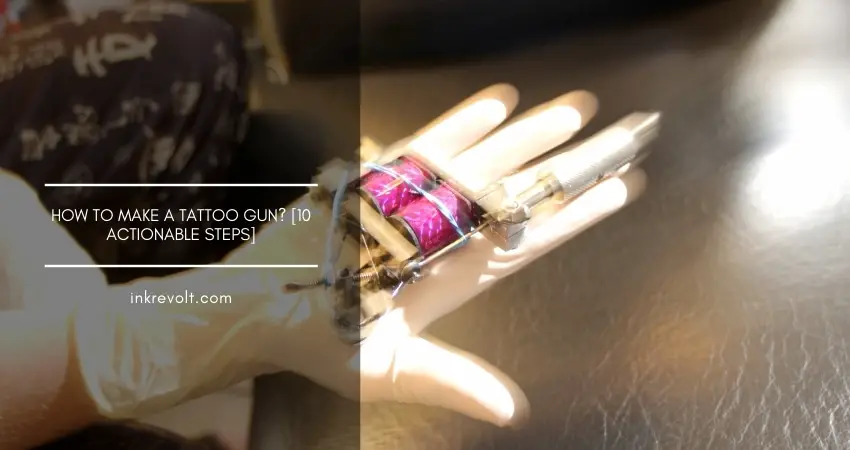
How To Make A Tattoo Gun: Assembling The Tattoo Gun
Step 5: Fastening The Tube With The Brace
Take the eraser off. Remove the lead if the mechanical pencil has any. Hold the toothbrush or spoon brace’s short end like you would hold a gun. Then tape your pencil to that end. The pencil’s open point with the eraser should now assemble with the spoon’s bend. And the pencil shaft should line up with the brace. The pencil’s point should cross the brace’s edge.
Check and confirm that you did the taping tightly. It cannot wiggle or wobble at all.
Step 6: Fastening The Motor With The Brace
Now strap the motor with the brace’s short end. Ensure that it stays straight and the button remains correctly placed in the center along the brace’s shaft.
Step 7: Inserting The Needle
You have to put the string’s one end through the pencil tip now. Then thread that through your tube. When you see it coming out of another edge, take your pliers to bend the string’s side to an angle of 90-degree. Now twist the string tip again to make another 90-degree angle. That is to give your needle a hook. If there is any wire left, cut it off. It does not have any use there.
Step 8: Attaching Your Needle To Your Motor
In this step, you need to set the hook into any of the buttonholes. While spinning the button, you will see your needle getting in and out effortlessly of the tube end. If you have to, trim it a little down.
What if you put an eraser in place of the button? You would have to make a 90-degree angle at the string’s end and then press it firmly into your eraser to keep it secure.
Note that you should keep the needle off-center. It should not lay straightly on the eraser’s middle.
Step 9: Connecting The Power Source
If you have any CD player, take its plug-in adapter. You can also grab a mobile charger or any power source with two wires. Then, to attach the wires to the motor’s contacts split them apart.
But if you are not willing to disconnect and reconnect the power source repeatedly while stopping to rinse the skin, buy a little on and off switch and fix it with the motor connection. You will get it in any electronics shop.
Step 10: Discarding Single-Use Items
After finishing your tattoo, you have to throw the tube and the needle away. Do not ever use them again. They are highly likely to spread diseases like HIV and hepatitis. Even if you think you will use them to make tattoos on your skin, it will not be worth the risks, especially when mechanical pens & pencils and guitar strings are very low-cost materials.
What Are All The Required Materials?
To learn how to make a tattoo gun on your own, you will need –
- A rotary motor
- A mechanical pen and pencil
- A toothbrush or teaspoon
- A guitar string
- A pair of scissors
- A pair of pliers
- A multi-power source
- Some black electrical tape
- Some tattoo ink
You will find most of them at your home. Other things like pliers and tattoo ink are available in your local electric stores and tattoo shops. They are usually not that costly.
Additional Read: How to make home made tattoo ink with a pencil
Any Tips To Follow To Get Some Advantages?
Yes, there are some tips you can follow, which will help you in your work.
- You can prepare many needles together so that you can throw them out after use.
- Make sure you never reuse them, and they stay sterile.
- You can also use a flame to sterilize needles before inserting them into your tattoo gun.
- It is better if you can get actual tattoo needles from online tattoo shops. They give better results than a sewing needle or guitar string.
Anything Else To Keep In Mind?
If you decide to make tattoos on human skin with this homemade tattoo gun, be aware of the risks you would be taking. Always, always maintain proper procedures for needle sterilization. Look for signs of injuries or infections.
Caution: the tattoo gun is for use on fruits or artificial skin. You should not practice it on live animals and human skin.
Final Words
Learning how to make a tattoo gun on your own is not that big a deal because the materials are inexpensive and available. Plus, the procedure is not risky at all.
Following the tips will facilitate you to do more in less time. However, remember to refrain from applying the tattoo gun on human skin. It is strongly advised that you use it on artificial skin for practice purposes to improve your expertise level.
I hope you have found the article helpful and are now confident about making a tattoo gun. Thank you for reading, and best of luck!