How To Tune A Tattoo Machine?
If you are a tattoo artist, then it is very important for you to know all about how to tune your tattoo machine. An out-of-tune tattoo machine can be very irritating and troublesome to work with. Moreover, an untuned tattoo machine will not produce a consistent result while tattooing.
For properly tuning a tattoo machine, you need to adjust the CPS (cycles per second) value of your machine to 130Hz and your machine’s duty value to 50%. You may also need to adjust the power that your machine receives from the power supply.
In this article, I will discuss in detail the steps by following which you can easily tune a tattoo machine. I will also discuss the main components that make a tattoo machine work.
So, without further ado, let’s get started!
3 Steps For Tuning A Tattoo Machine
The process of tuning a tattoo machine is very simple if you follow the correct steps. Let’s start with the first step:
Step 1: Adjust The Power
The power supplied to your tattoo machine will dictate how fast your machine will run. If you supply less power, the coils in your machine will not be able to produce enough magnetic pull to attract the armature bar. Not having enough magnetic pull will render your machine useless as it will not be able to move the tattoo needle.
If you want a properly functioning tattoo machine, you must carefully adjust the power supplied to the machine. Start by connecting the tattoo machine with the power supply. Set the power to one volt and then gradually increase it. As you increase the power, you will notice a very slight movement in the armature bar.
Keep increasing the power until the armature bar moves all the way up and touches the contact screw. You will hear a distinctive buzzing noise if you hit the correct voltage. Just to be on the safe side, make sure to increase the power to an extra one volt after you hear the buzz. For instance, if you hear a buzz at seven volts, then set the power to eight volts.
Read More: Power Supply for Rotary & Coil machine
Step 2: Set The CPS Value To 130
Selecting the proper CPS value is very important for a tattoo artist. CPS or cycles per second denotes the number of times the armature bar, and the needle of your tattoo machine moves up and down in one second.
The CPS reading can be found in the display of your power supply. If your machine displays a CPS reading of 75Hz, it means the armature bar of your machine is moving up and down 75 times in one second.
As mentioned earlier, the contact screw regulates the speed of the machine. So if you want to adjust the CPS value of your machine, you have to fasten and unfasten the contact screw basically.
Just like the previous step, start by connecting the machine with the power supply. After doing so, keep an eye on the speed section of the power supply. Do not worry if you can’t find the speed value in the CPS unit. Some power supplies display the speed value in the HZ unit instead of the CPS unit.
If the power supply displays a low CPS value, you need to fasten the contact screw. And if it shows a high CPS value, you need to unfasten the contact screw. Keep adjusting the screw until the CPS value hits 130 in the power supply.
Step 3: Set The Duty Value To 50%
If you want to get the most out of your tattoo machine, you must properly tune the duty value. The duty value indicates the percentage of time that your tattoo machine is active during a session.
For example, if your machine’s duty value is 40%, that means the machine is active for 40% of the time during a session. You can find the duty value reading on your power supply.
In order to adjust the duty value, you need to bend the back spring of your tattoo machine. Loosen the screw that holds the rear spring. Then, rotate the armature bar to 180 degrees. After doing so, try to bend them back spring by applying a little amount of pressure upward. Be gentle, don’t apply too much pressure.
After that, place the armature bar in the original position, retighten the screw and connect the machine with the power supply. You should see a change in the duty value now. Keep repeating the process until you hit the 50% margin.
Additional Read: How To Put A Tattoo Machine Together
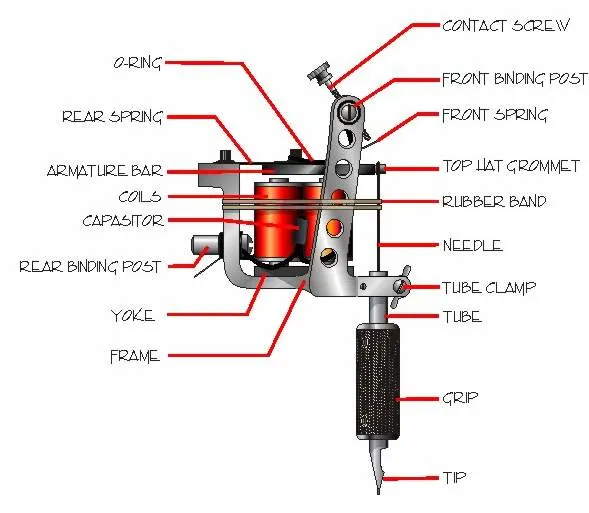
The 5 Main Components Of A Tattoo Machine
In total, five principal components work together and help a tattoo machine to function properly. The components are:
- The Armature Bar
- The Back Spring
- The Front Spring
- The “O” Ring
- The Contact Screw
Before knowing how to tune a tattoo machine, we must know how the parts mentioned earlier work and what function they serve.
The Armature Bar
All the components, as mentioned earlier, are held together by the armature bar. They sit on the armature bar and help it to move up and down in rapid succession. The up and down motion of the armature bar moves the tattoo needle like a sewing machine.
The buzzing noise that you hear from a tattoo machine is created because of this rapid up and down motion of the armature bar.
The Contact Screw
The contact screw is a very important part of the tattoo machine. It acts as a switch that helps the machine to turn on and off. It also acts as a speed regulator.
The Front And The Back Spring
The front and the rear spring play a very important role in maintaining the up and down reciprocating motion of the tattoo needle. It helps to turn the machine on and off multiple times a second.
The way how the front and the rear spring works in a tattoo machine can be a bit complex to explain. I will try my best to explain it to you without being too complex.
When the front spring makes contact with the contact screw, the armature bar and the front spring gets pulled down by the magnetic coils. The pull from the electromagnetic coil disconnects the circuit and shuts down the machine.
Then, the rear spring helps to catapult the armature bar upward in order to reconnect the front spring with the contact screw. The reconnection of the front spring completes the circuit and turns the machine on once more. This process gets repeated several times in a second.
The “O” Ring
The “O” ring’s main job is to pull the front spring upward so that it always remains under constant tension. The constant tension of the front spring helps it to make contact with the contact screw.
Hopefully, this article helped you in learning how to tune a tattoo machine properly. If you face any trouble while tuning, you can always send the machine to a professional tuner.