How To Setup A Tattoo Gun And How To Use It
How well a tattoo gun will perform depends a lot on whether it is properly setup or not in the first place. Because if it is not, it will give you a trying time especially if you can’t manage its basic mechanics on your own. Therefore, the best thing is to make sure that you setup it the right way and know how to use it properly.
To setup a tattoo gun, you have to get a starter kit package with which you will setup the gun following 3 steps: arranging the pieces, getting the needle ready, and assembling it. After that, you will have to deal with the power supply.
In the rest of the article, I will be discussing the steps of setting up a tattoo gun and the way of using it. If you are a beginner and do not know where to start, you will find the article helpful. There will be some great tips too!
Read More: Setting Up A Tattoo Gun For Line Work
What Does A Starter Kit Package Have?
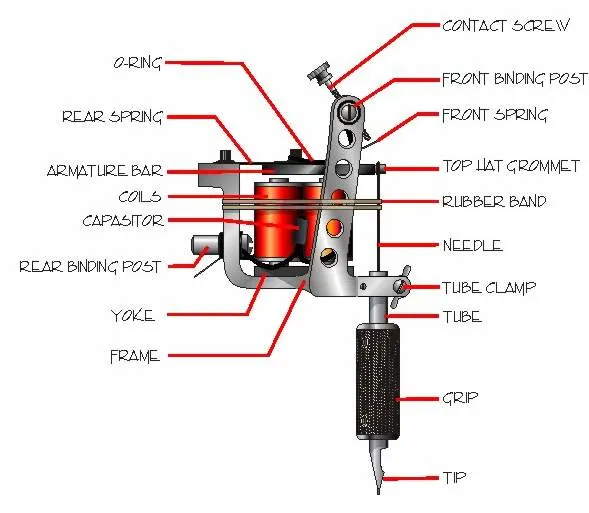
A starter kit package typically includes needles, armature bars (to control the needle), coil parts (to control the armature bars), tattoo gun (more than one depending on what package you buy), and ink (some packages have the basic colors, some have a variety of them).
The components vary with the price.
Step By Step Guidelines To Setup A Tattoo Gun
Step 1: How Do I Arrange The Pieces?
Preparing a tattoo gun can be very confusing in the beginning. To make it easy, get all the components together and organize them. This way, when you start assembling it, you won’t have to leave the spot every time you need a component and make a mess out of it.
After you get everything you need beside you, look at the tattoo gun. Search for a metallic contact screw under which there should be a front spring. The distance between the screw and the spring is almost the same as a coin’s thickness.
The line you will tattoo is under the control of this distance. If it is not on, it might ruin your tattoo. Turn the screw drive to switch it on. The distance will be increased or decreased by the screw drive.
Read More: DIY Tattoo Gun Making
Step 2: How Do I Get The Needle Ready?
Always be very careful about the needles. They should come in a new and unopened package and be already pre-sterilized. Inspect them thoroughly and be sure that they are flawless. Because dull or bent needles can be the cause of more blood which can make the process very painful and end up with a scarring tattoo.
Also, remember to inspect the tube where you will hold the gun. There are 2 kinds of tubes: one is disposable and the other is autoclaved. They should also be in a package.
Discard the tube after opening the package and insert your needle into it.
Step 3: How Do I Assemble It Now?
Once the inserting is done, get the needle in the slot of the tube. Then, sliding it up, screw up the wingnut a little. The wingnut is a hardware that connects the tattoo gun with the tube.
While inserting the O-ring, ensure that the needle’s eye loop faces left. This will confirm that the needle insertion has been correctly done.
Do it very carefully and meticulously. Because doing it the wrong way will make a painful and inkless skin piercing.
Now, set the needle’s length which is the distance between the needle and the tube’s point. Tighten the screws and fix the needle. The recommended distance is 0.04-0.07 of one inch.
Here’s a tip for you: use one or two rubber bands to hold the needle and keep it stabilized. It will help to make a very clean line.
Additional Read: Setting Up A Tattoo Machine
What To Do With The Power Supply?
There is also a power supply that comes with a starter kit. It works well but its settings are not adjustable.
That’s why it is better (another tip!) if you buy one with either a digital or analog display. Before you start it, check if everything is correctly tuned. Use the right amount of voltage which actually depends on the gun. The right amount varies from 1.5 to 18 volts.
There are two more essential things – the clip cord and the footswitch. The first one creates a connection between the power and the gun. You will have to buy these two separately. They are not expensive.
You have to connect the cord at the foot of the gun. Once you get it all prepped to function, you can start it.
How Do I Use The Tattoo Gun?
If you have a tattoo gun, you will always have to keep it super clean. This is extremely important to avoid any kind of infection.
This also means that you’ll have to wash your hands carefully before you start to work with the gun.
It is recommended that you get latex gloves to wear while you are preparing the gun and using it. It prevents bacteria transmission during the process.
I guess what I am trying to tell you is that you should take all the safety measures every time you prepare, use, and clean the gun. It might be a little taxing but it is very important for ensuring safety.
The right way to hold the gun is to keep a tight grip on the tube of the needle. The gun will vibrate a lot when it starts. The bigger its size is, the more vibration it will make.
To make it simpler, hold it the way you would hold a thick pen or pencil. See if your hand is under the gun. If it is not, you are not doing it right and you can’t start tattooing that way.
Operate the footswitch if the power needs to be controlled.
Tip: Before you start tattooing on real skin, practice working on some artificial skin. It will help you understand if you have set the needle correctly.
If you see any damage, it means that your needle is running very deep. Keep practicing until you get it right.
Additional Read: How to Tune A Tattoo Machine
Final Words
Do not start working on the first tattoo if you have not tested your gun as well as your ability beforehand. Practice as long as it takes before you are completely ready to do this. Remember, you do not want to hurry and end up making a messed up, painful, and scarring tattoo.
Be both careful and caring about the entire process to get something amazing out of it. Best wishes making tattoos!